Installation#
If you get stuck anywhere in the installation process, please see Issues Q&A or reach out on Discord.
Video Tutorial#
For a visual reference to help install Mantella, see this video from MrHaurrus (the video is in French with English subtitles):
Note
xVASynth does not need to be run before Mantella.exe, and the bugs mentioned in the video have since been fixed.
Requirements#
Hardware Requirements#
xVASynth#
CPU
xVASynth runs in CPU mode by default, using a single CPU core/thread. Generally, if you can already run Skyrim, xVASynth should work with most CPU setups.
GPU (Optional)
NVIDIA cards that have CUDA can run xVASynth in GPU mode. Using the same GPU for both xVASynth and Skyrim may cause stutter.
Mantella#
There has been one report of Mantella crashing when running a modlist of 2,000+ mods. Mantella needs a certain amount of hardware allocation to run successfully, and if this is being soaked up by other hardware intensive mods there is a chance it will crash.
Storage Requirements#
This mod requires ~29GB of space when xVASynth and all voice models are installed. Temporarily another ~17GB is needed to unpack the voice models, unless the torrent is used which does not have the voice files archived.
Compatibility#
Some users have reported that Skyrim crashes when Mantella is used with Fuz Ro D’oh. A possible fix is to disable and re-enable Fuz Ro D’oh
The mod VR Keyboard conflicts with Mantella
Mantella requires Windows 10 / 11 (it is yet unconfirmed whether it works on Windows 7)
Mantella has been confirmed to work with the FUS (by pointing
skyrim_folderto Skyrim), Librum (by pointingskyrim_folderto overwrite/root), and Wildlands (by pointingskyrim_folderto Wildlander/SKSE), and Nolvus Wabbajack modlists.Mantella needs to be loaded after the Unofficial Skyrim Special Edition Patch (USSEP) mod in your load order
Skyrim#
Warning
As Mantella accesses and writes to files within your Skyrim folder, it is unlikely to work correctly if you have Skyrim stored in Program Files / (x86). Please ensure that you have Skyrim stored outside of this folder (eg C:\Games\Steam).
Steam does not allow to create a new Steam Game Library on the same disk. You can either move the whole Steam client outside as described on this Steam Support page or use LostDragonist/steam-library-setup-tool to allow multiple Steam Game Libraries on one disk.
Mantella Files#
The Mantella files can be downloaded from Nexus Mods.
File |
Installation |
|---|---|
Mantella Software |
Extract this folder somewhere convenient to you (if you need some inspiration, you can store it in Documents). Do not store this folder in Program Files / (x86), Desktop, or your Skyrim folder. |
Mantella Spell |
This file can be installed in the same way as other mods with your mod manager. |
xVASynth#
xVASynth is used as the text-to-speech engine by Mantella due to it being free open-source software and already having Skyrim voice models trained.
Download xVASynth via Steam (preferred) or Nexus. Do not store xVASynth in your Skyrim folder.
Download the Skyrim voice models. You can either download all models via a torrent, via the xVASynth UI if you have Nexus Premium, or manually via the Nexus Mods page:
xVASynth Model Installation Options
💎 Nexus Premium (Quickest)
If you are subscribed to Nexus Premium, (1.) open the xVASynth UI and select “Get More Voices” from the bottom left corner. (2.) Unselect all games except for Skyrim, (3.) click “Check now” (you will be prompted to login to Nexus), then (4.) “Download All”.
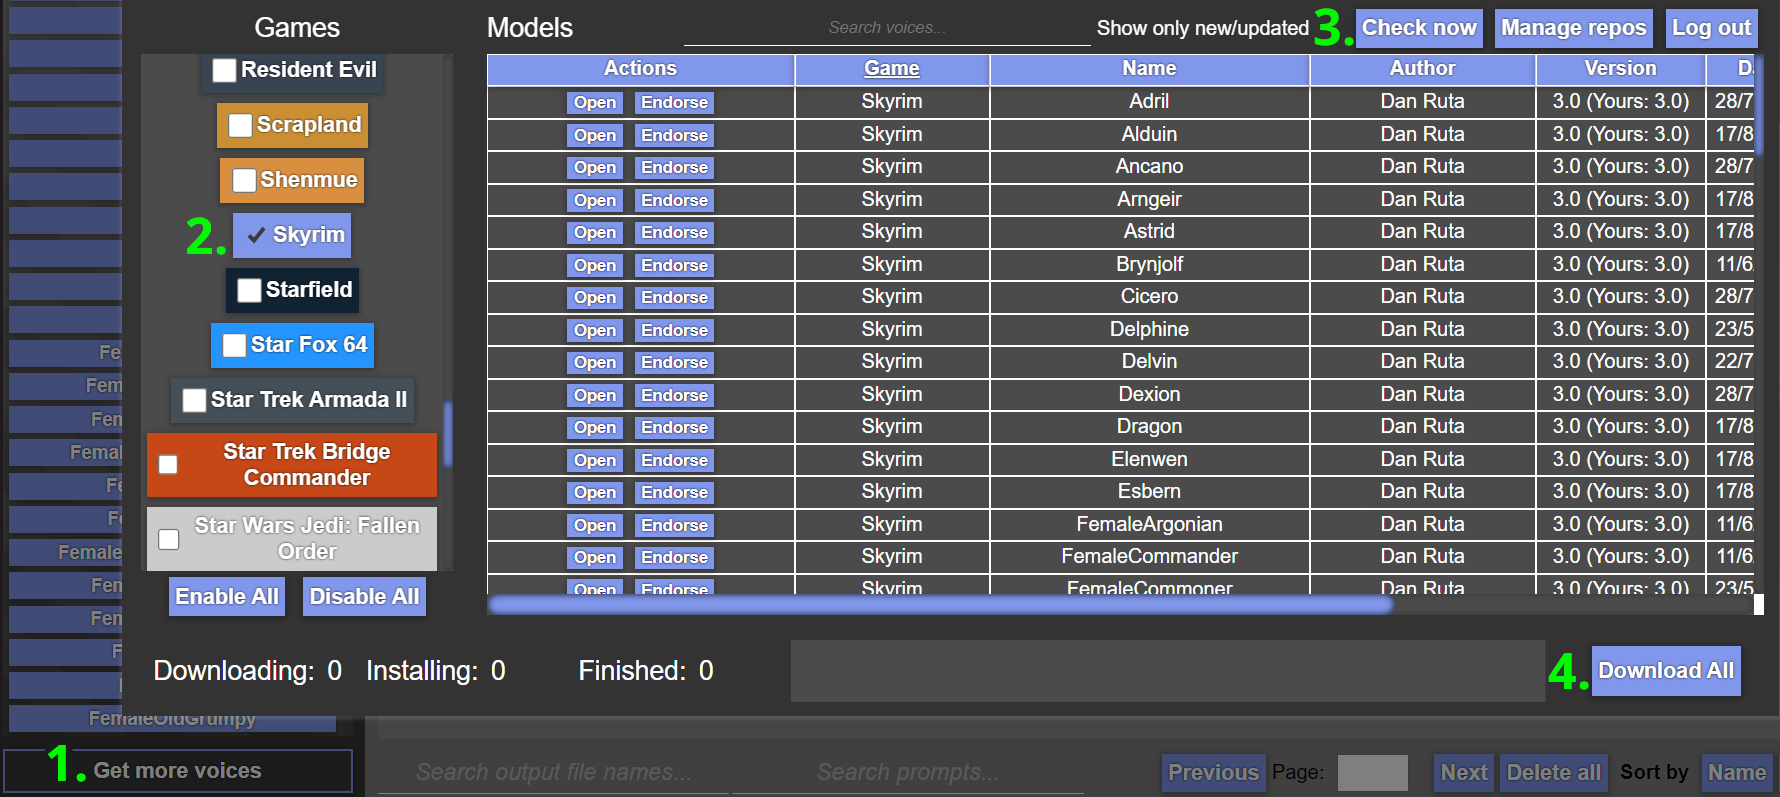
Note
You may need to restart the download a few times for all voice models to properly download.
🌊 Torrent (Slowest, Easiest)
Voice models can be downloaded via a single torrent. Torrents can be downloaded via Bittorent clients such as qBittorent. Note that download speeds vary depending on the time of day. Paste the below magnet link in your browser to receive a popup to open it via your Bittorent client, and set the download location to your_xVASynth_folder/resources/app/models/skyrim:
magnet:?xt=urn:btih:798BB3190E776BFDCF590910C0805656420F45BC&dn=skyrim&tr=udp%3a%2f%2ftracker.opentrackr.org%3a1337&tr=udp%3a%2f%2fexplodie.org%3a6969&tr=wss%3a%2f%2ftracker.btorrent.xyz&tr=wss%3a%2f%2ftracker.openwebtorrent.comNote
This magnet URI may be removed from this page if any voice model becomes unavailable on Nexus Mods.
🛠️ Manual (Hardest)
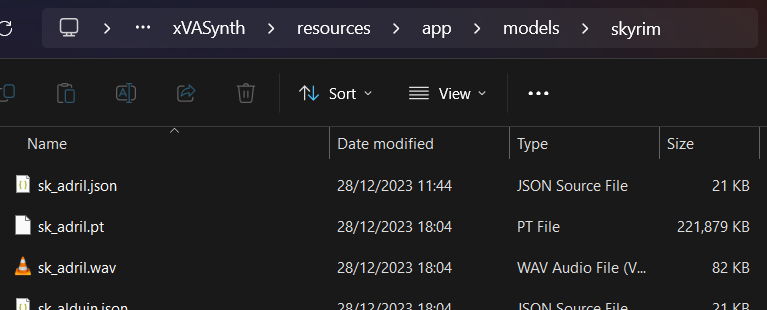
If you do not have Nexus Premium, or if the torrent is not available, you can also download the voice models directly from Nexus here (under “Optional”, not “Old”). Once you have manually downloaded each voice model into a folder, unzip the models manually into the correct xVASynth folder (
xVASynth\resources\app\models\skyrim). Once the extraction is complete, you can delete the zipped voice model files.
The contents ofxVASynth\resources\app\models\skyrimshould look like the below:
Note
If downloading all models sounds a bit daunting, you can start with the “Male Nord” and “Male Soldier” voice models to at least allow talking to Skyrim guards.
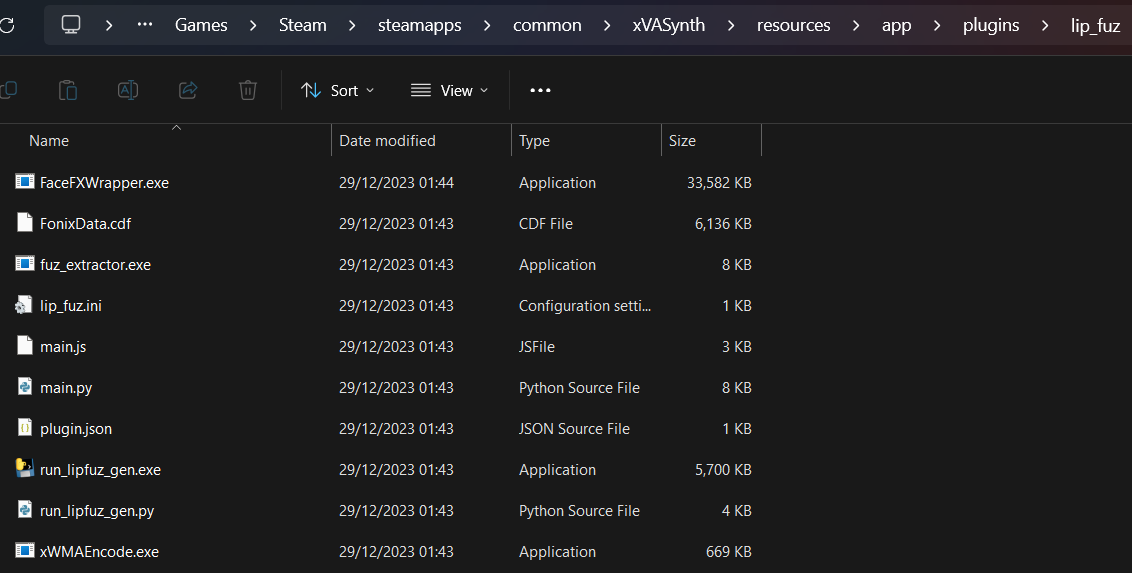
Download the .lip plugin for xVASynth here and download FaceFXWrapper from here (you do not need to download CK64Fixes). Instructions on how to install these are on the .lip plugin Nexus page. Make sure to place FaceFXWrapper in the plugins folder as stated on the .lip plugin page.
When installed correctly, it should look like the below:
(Optional) Download the xVASynth DeepMoji Plugin here. It boosts the emotionality of xVASynth voice models to make them sound less robotic (only available in English).
Required Skyrim Mods#
Warning
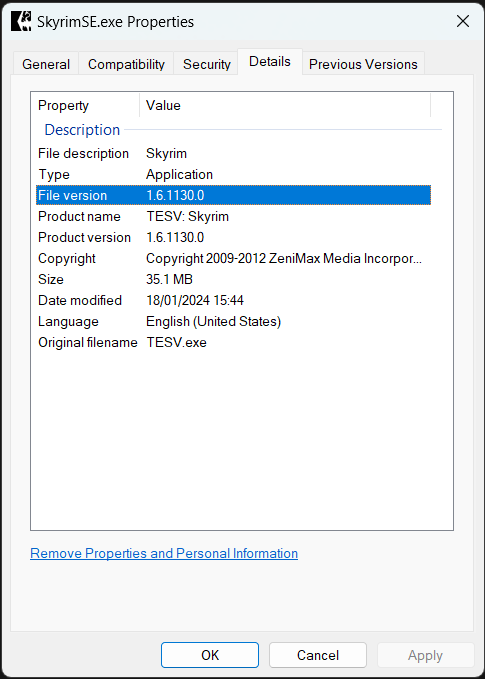
Always ensure you are downloading the right version of each mod for your version of Skyrim. This is the #1 reason for installation problems. You can check your Skyrim version by right-clicking its exe file in your Skyrim folder and going to Properties -> Details -> File version. VR users can just download the VR version of each mod if available, or SE if not.
Please follow the installation instructions on each of the linked pages:
Mod |
Notes |
|---|---|
Once installed by following the included readme.txt, run SKSE instead of the Skyrim exe. Note that there is a separate VR version of SKSE |
|
VR Address Library for SKSEVR or Address Library for SKSE Plugins |
|
The VR version can be found under “Miscellaneous Files” |
|
If using text input instead of mic |
|
To access Mantella’s MCM |
Optional Skyrim Mods#
These mods aren’t strictly necessary for Mantella to work, but they do greatly improve the experience.
Mod |
Notes |
|---|---|
Recommended so that Mantella voicelines are not interrupted by vanilla voicelines. |
|
Stops certain NPCs from turning hostile when you cast the Mantella spell on them. This mod requires the Unofficial Skyrim Special Edition Patch (USSEP). Mantella needs to be loaded after USSEP in your load order. |
Language Models (LLMs)#
LLMs power the creation of responses by NPCs. There are a number of different LLMs to choose from, ranging from free local models to large externally hosted models.
Note
Some smaller models may struggle to handle long term conversations and memory summarising.
If you just want to get started without thinking too much about it / explore alternative options later, follow the OpenAI setup instructions below.
API Models#
OpenAI (First $5 Free)
Copy your OpenAI secret API key (see here if you need help finding it (you will need to set up an account if you haven’t already)) and paste into MantellaSoftware/GPT_SECRET_KEY.txt. Do not share this key with anyone. While there is a free trial, you will need to set up your payment details for the API to work.
OpenRouter (First $1 Free, Free Models Often Available)
Create an account with OpenRouter. Go to the “Keys” tab and generate a new key, saving its value to MantellaSoftware/GPT_SECRET_KEY.txt. Do not share this secret key with anyone. In MantellaSoftware/config.ini, set model to a model from the list here (eg undi95/toppy-m-7b). Set alternative_openai_api_base to “https://openrouter.ai/api/v1” (without quotes).
Local Models#
text-generation-webui
Install the latest text-generation-webui .zip from here.

Place a local model into the
text-generation-webui\modelsfolder (to get started, you can downloadtoppy-m-7b.Q4_K_S.gguffrom here).

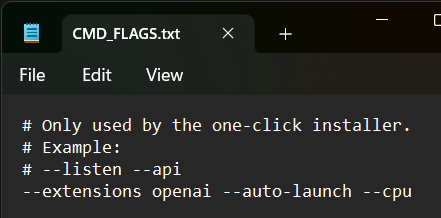
Paste the text “–extensions openai –auto-launch” (as well as “–cpu” for CPU users) into the installed folder’s CMD_FLAGS.txt file.
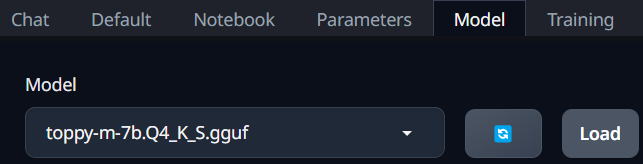
Start text-generation-webui and wait for the UI to open in your web browser. Navigate to the “Model” tab, select your model from the drop-down list, and click “Load”.
In your
MantellaSoftware/config.inifile, setalternative_openai_api_baseto “http://127.0.0.1:5000/v1” (without quotes). Don’t worry about themodelsetting inMantellaSoftware/config.ini, it will be overriden by the model selected in text-generation-webui.
Note
Make sure text-generation-webui is running when Mantella is running!
koboldcpp
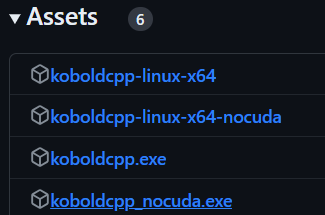
Install koboldcpp’s latest release from here. If you want to run koboldcpp on your CPU or otherwise do not have an NVIDIA GPU, download
koboldcpp_nocuda.exeunder “Assets”. If you have an NVIDIA GPU with CUDA support, downloadkoboldcpp.exeunder “Assets”.
Download a local model, such as
toppy-m-7b.Q4_K_S.gguffrom here.
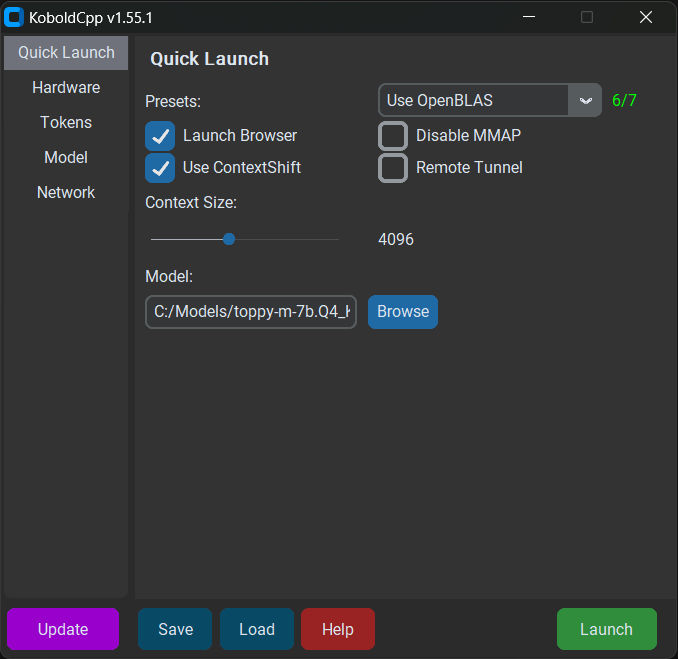
Run koboldcpp.exe. When presented with the launch window, drag the “Context Size” slider to 4096. Click the “Browse” button next to the “Model” field and select the model you downloaded. Click “Launch” in the bottom right corner.
Optional
Under the “Presets” drop down at the top, choose either Use CLBlast, or Use CuBlas (if using Cuda). You will then see a field for GPU Layers. If you want to use CPU only leave it at 0. If you want to use your GPU, you can experiment with how many “layers” to offload to your GPU based on your system.
In your
MantellaSoftware/config.inifile, setalternative_openai_api_baseto “http://localhost:5001/v1” (without quotes). Don’t worry about themodelsetting inMantellaSoftware/config.ini, it will be overriden by the model selected in the previous step.
Note
Make sure koboldcpp is running when Mantella is running!
koboldcpp Google Colab Notebook (Free Cloud Service, Potentially Spotty Access / Availablity)
This option does not require a powerful computer to run a large language model, because it runs in the Google cloud. It is free and easy to use, and can handle most .gguf models that are up to 13B parameters with Q4_K_M quantization all on the free T4 GPU you get with Google Colab. The downside is Google controls dynamically when the GPUs are available and could throttle your access at any time, so it may not always work / be available.
To use this method, go to this web page. Click the play button that appears below the text “Enter your model below and then click this to start Koboldcpp.” Wait until text stops generating (probably will take a minute or two). You should see a URL link near the end of the text after a statement like “Connect to the link below,” with a silly name, in a format like https://its-taking-time-indeed.trycloudflare.com. You may want to click on the link just to ensure koboldcpp pops up to ensure it is ready before proceeding.
Select that link and copy it with CTRL+C. In your MantellaSoftware/config.ini file, set alternative_openai_api_base to that URL by pasting it, and then add /v1 at the end. So it will look something like alternative_openai_api_base = https://its-taking-time-indeed.trycloudflare.com/v1. Make sure to keep your browser open to the koboldcpp Colab notebook while using Mantella so it does not turn off. If you want to choose a different model to use with this method, make sure it is a .gguf model and follow the instructions on the Colab to do so.
Note
Be sure to close your browser tab once you’ve finished your Mantella session to free up the GPU and help avoid hitting Google’s usage limits.
Other LLM Services#
Mantella has the ability to support other language model services, although these services do need to support outputs in the OpenAI format (like text-generation-webui does via the “–extensions openai” option above).
Whisper#
Whisper via your CPU is handled automatically. Open this section only if you like tinkering
guillaumekln’s Faster-Whisper version of Whisper is used as Speech-To-Text engine by Mantella. The engine is already part of the executable and will download a chosen model automatically when launched. Uses a single CPU core by default when listening to the set default Windows microphone. Alternatively text input can be enabled by setting microphone_enabled = 0 within MantellaSoftware/config.ini.
It is reasonably fast even in CPU mode with the base model. Optionally, to use GPU/CUDA mode, some extra files are required, see Faster Whisper documentation. Note that cuBLAS may already be part of the CUDA Toolkit, so you may only require the cudnn_###_infer64_8.dll files to be beside the Mantella executable. Afterwards enable process_device = cuda under [Microphone] in MantellaSoftware/config.ini.
Setup & Configuration#
Set up the MantellaSoftware/config.ini file with your paths to Skyrim (
skyrim_folder), xVASynth (xvasynth_folder), and the Mantella Skyrim mod (mod_folder).skyrim_folder
Mod Organizer 2 Users
By default, this is simply the path to your Skyrim folder. If you are using a Wabbajack modlist, you may need to try searching for a folder called overwrite/root or “Stock Game” in your Mod Organizer 2 / Wabbajack installation path and set this as your
skyrim_folderpath. For FUS users, once you set this path and cast the spell once, you then need to set yourskyrim_folderpath back to your actual Skyrim folder.Vortex 2 Users
This is simply the path to your Skyrim folder.
mod_folder
Mod Organizer 2 Users
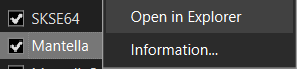
You can find the mod folder by right clicking the mod in the Mod Organizer 2 UI and selecting “Open in Explorer”:
Vortex 2 Users
You need to point
mod_folderto your Skyrim/Data folder. So essentially, you need to take the Skyrim folder set inskyrim_folderand add “\Data” to the end of it. For example:mod_folder = C:\Games\Steam\steamapps\common\Skyrim Special Edition\Data
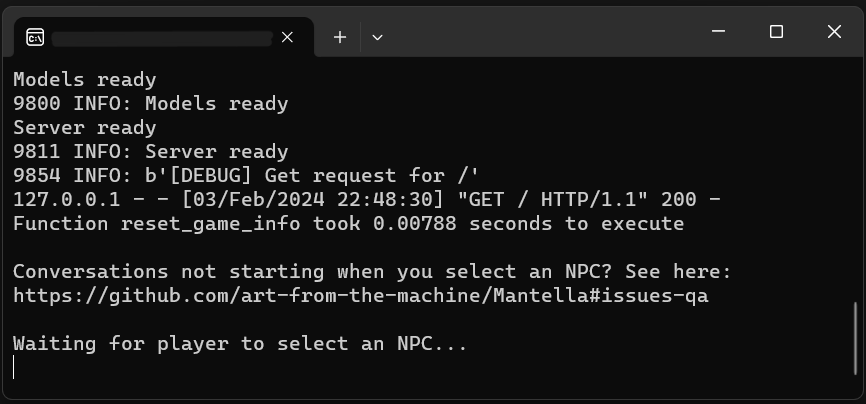
Run Mantella.exe in MantellaSoftware and wait for the message “Waiting for player to select an NPC…” to display. Once it does, it is ready for you to select an NPC in-game via the Mantella spell.
Warning
Do not try to run Mantella.exe through Mod Organizer 2 / Vortex as it will not work correctly.
When you first load the mod, MAKE SURE TO CREATE A SAVE AND RELOAD THAT SAVE. The voicelines will not play otherwise! You do not have to start a new game to do this, you can also create a new save in an existing game.
Note
While there have not been issues reported with using Mantella in an existing save so far, please be aware that adding mods mid-game can cause problems.
The Mantella spell & power should be added to your inventory under the Illusion category in the Magic menu once you install the mod. Conversations can be started by selecting an NPC with the spell, power, or hotkey (default is H). You can end a conversation by casting the Mantella End Conversation spell, or by simply saying / typing “goodbye”. If the NPC responds with “safe travels” then the conversation has ended correctly via this latter method.
Other Tips#
Text Input#
Text input can be enabled by either setting microphone_enabled = 0 in MantellaSoftware/config.ini or via Mantella’s MCM in-game.
Group Conversations#
Once a conversation has started, you can add more NPCs to the conversation between each of your responses:
Cast Mantella on NPC1 -> Say hi to NPC1 -> Cast Mantella on NPC2 -> Say hi to NPC1 & NPC2 etc
MCM#
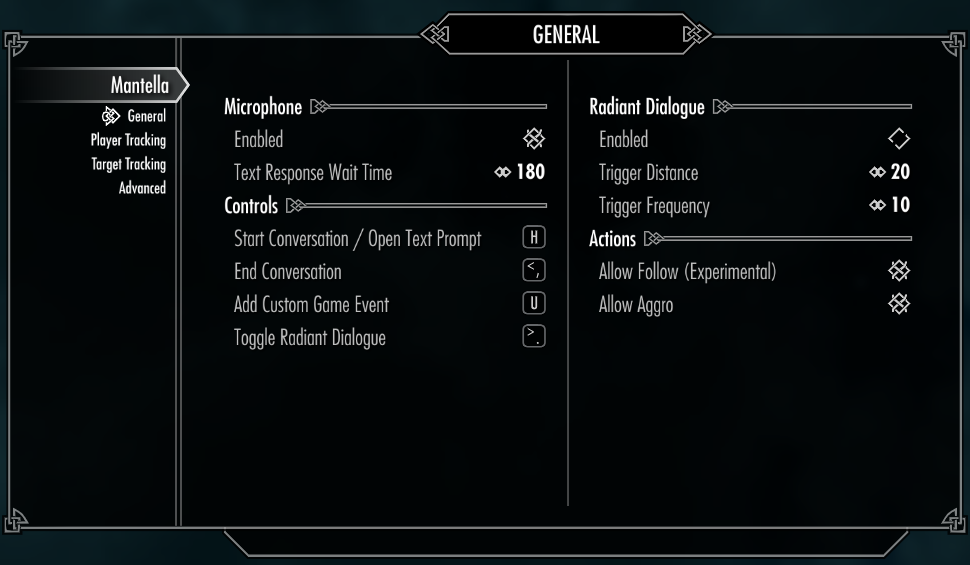
Many options can be tweaked in the Mantella MCM, such as NPC actions and radiant conversations.
NPCs not Found#
If the NPC is unavailable to Mantella (most likely a modded NPC which you can add yourself via Adding Modded NPCs), the message “Conversation ended.” should immediately pop up in the top left corner and the conversation will exit. If the only message you see from the spell is “Conversation ended”, please refer to the “Issues Q&A” section for common solutions to this.
Caching#
Voicelines are cached in the MantellaSoftware/data/voicelines/ folder. If this data takes up too much space over time, the contents of voicelines/ can be periodically deleted.
Issues#
If you are experiencing errors, please see Issues Q&A. Otherwise, please share the details of the errors and your MantellaSoftware/logging.log file on the Mantella Discord #issues channel.